Twitt3r.xyz

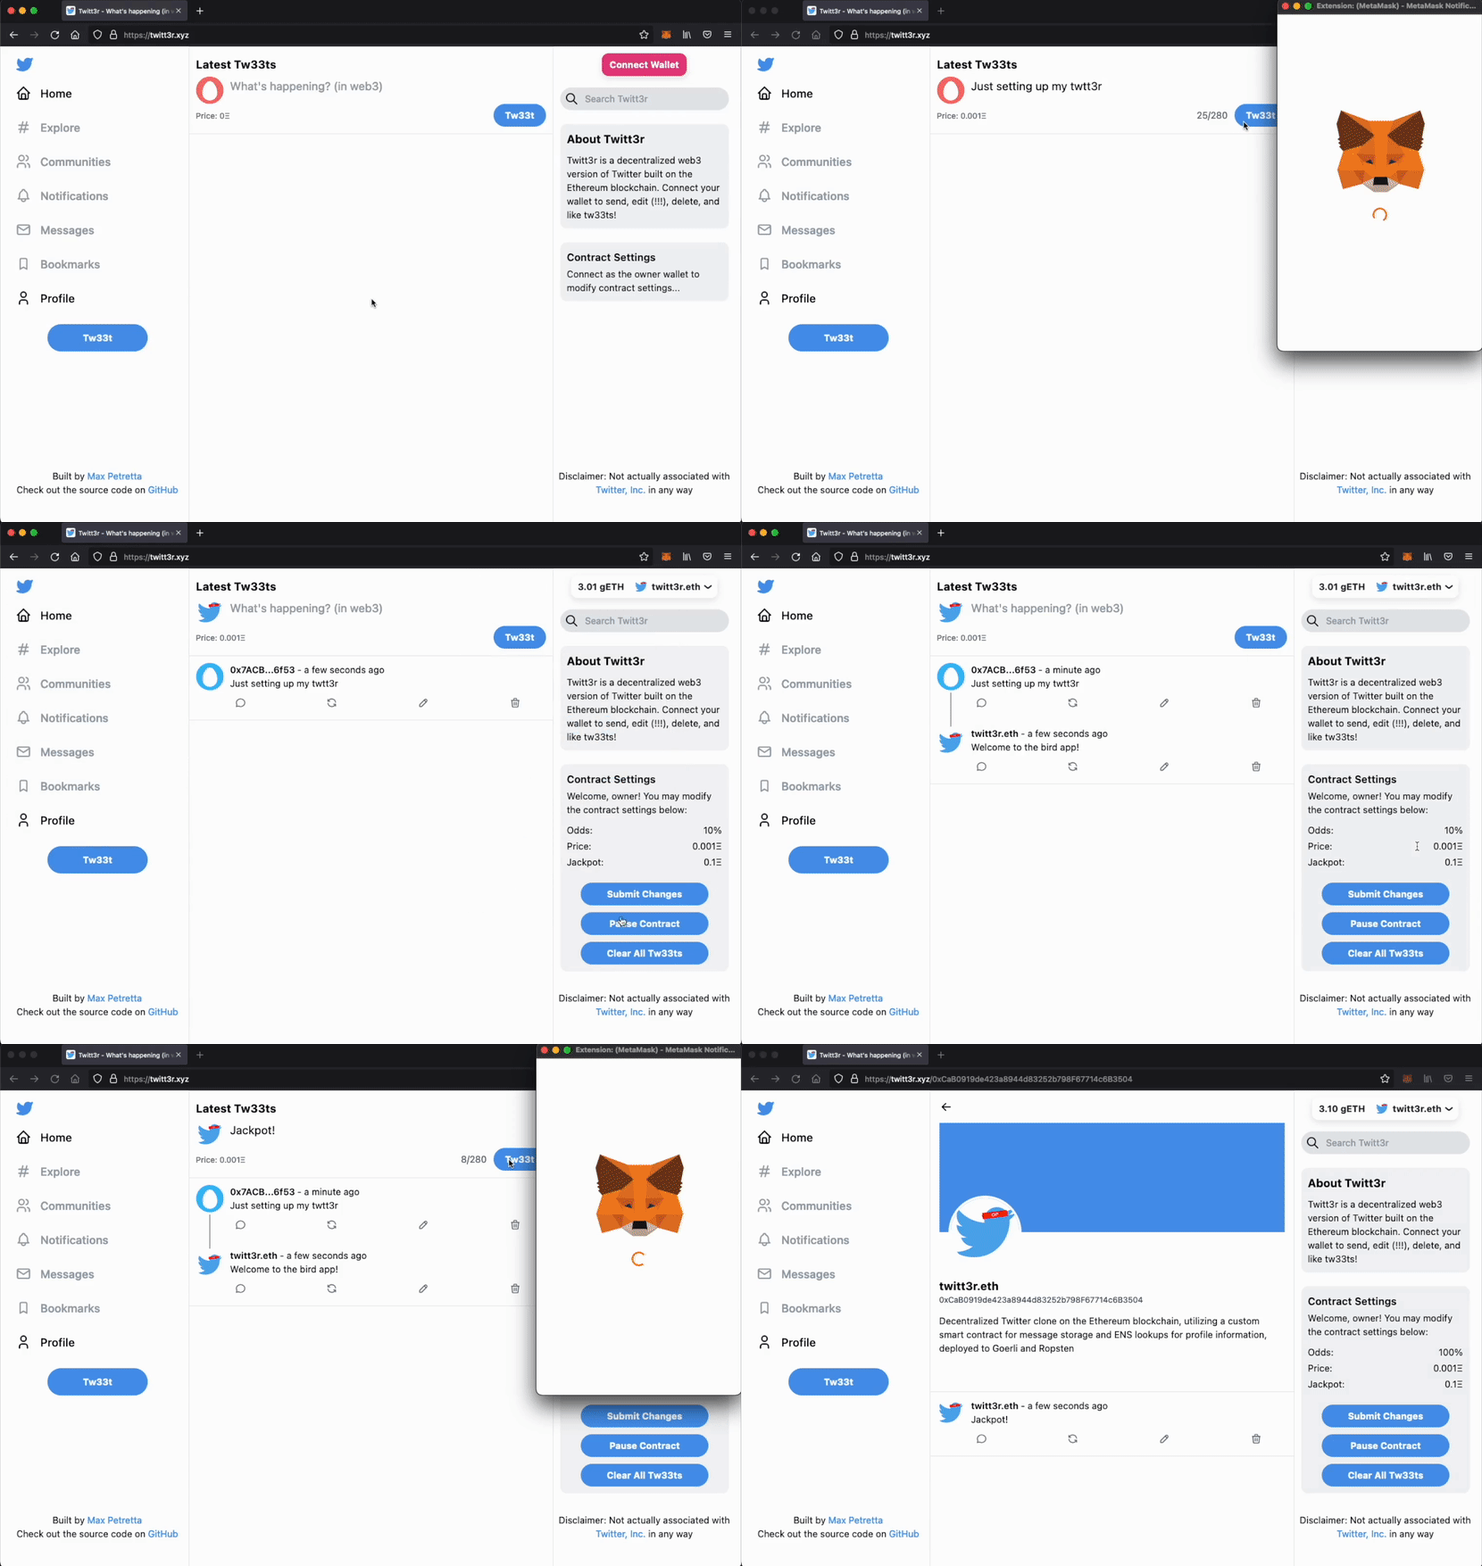
Introducing Twitt3r.xyz, a decentralized Twitter clone built on the Ethereum blockchain. Live now on Goerli and Ropsten testnets. Connect your wallet, send tw33ts, and check out user profiles (with help from ENS).
Interested? Great! Let’s explore how we got here…
Prelude
Over the last year, I’ve grown more interested in the web3 space, particularly the ecosystem surrounding Ethereum. I plan on doing a deeper dive on the “why” at a later point, this post will focus more on the “what/how”.
Brief summary: Ethereum is a Proof-of-Work blockchain (although that may soon change 🤞) that enables developers to write and deploy “smart contracts”. These programs can then be freely used by anyone. To learn what that entails, I decided to build a little side project using smart contracts, and some newer frontend libraries for interacting with them.
But what to build? It’s easy to go with the classic to-do app, but I wanted to pick something uniquely suited to blockchain. Let’s generalize heavily here, and go over some strengths of blockchains:
- Unique user identities (wallets) by default
- Open protocols that can be used/built upon by anyone
- Deploy once for global availablity
To me, the obvious choice for this tech was Twitter. And it seems like @jack agrees:
It wants to be a public good at the protocol level…
It does seem like a great fit, Twitter should be a protocol, much like HTTP or SMTP. This makes even more sense after realizing that some pretty core Twitter features were invented by the community, through third-party clients built on an open API.
Smart Contracts
Now that we know what we want to build, let’s look at how we can build it. The contract is the perfect place to start, as it forms the core of our app.
There are several languages for smart contracts, the most popular being Solidity, a C-like curly bracket language. There’s also Vyper, which is closer to Python. I chose to go with Solidity, but either would work just fine.
Here’s a basic hello world in Solidity:
// SPDX-License-Identifier: MIT
pragma solidity ^0.8.12;

contract HelloWorld {
    string private name;

    constructor(string memory _name) {
        name = _name;
    }

    function sayHello() public view returns (string memory) {
        string memory message = string.concat("Hello ", name, "!");
        return message;
    }
}
If you have experience with C++ or Java, this should look pretty familiar. A few things worth noting:
- Line 2: In Solidity, we have to specify the version of the compiler we want to use directly in the source code. Here we set the compiler to version 0.8.12, or any subsequent minor release.
- Line 8: The only time we modify the
namevariable is during the contract constructor call. More on that later. - Line 11:
sayHello()is marked as apublic viewfunction. This means that the function can be called by anyone (public), and does not modify the state of the contract (view). - Lines 7, 11, & 12: You’ll notice that wherever we use the
stringtype, we follow it withmemory. There’s three types of memory in the Ethereum Virtual Machine (EVM): memory, storage, and calldata.memoryindicates that a variable need only exist while it’s surrounding function is running, after which it can be discarded. If we used the permanentstoragetype, it would cost significantly more gas, increasing transaction fees.
And that’s it! If you deployed this contract, you’d have global “protocol” that anyone could interact with to say hello to you. But only you, since it’s impossible to change the name property!
That’s because we forgot to add a setter method to update name. We can’t add one after the fact due to Ethereum being immutable, meaning you cannot change past transactions or deployments. This should scare pretty much every developer, but it’s why testing and audits are commonplace in smart contract development.
The Twitt3r Contract
Let’s look at a few sections of the Twitt3r contract in detail. If you’d like to see the whole thing, check it out on GitHub here.
import "@openzeppelin/contracts/access/Ownable.sol";
import "@openzeppelin/contracts/security/Pausable.sol";
import "hardhat/console.sol"; // DEBUG

/**
 * @title Twitt3r
 * @author Max Petretta (maxpetretta.eth)
 * @notice A decentralized version of Twitter, built on the Ethereum blockchain
 * @dev Not audited!
 */
contract Twitt3r is Ownable, Pausable {
    uint8 public odds;
    uint256 public price;
    uint256 public jackpot;
    address public lastWinner;
    uint256 private seed;

    struct Tweet {
        address from;
        uint256 timestamp;
        string message;
        bool deleted;
        uint256 replyID;
        uint256 retweetID;
    }

    /**
      * @notice Deploys the Twitt3r contract with the given settings
      * @param _odds The percentage (0 - 100) chance of a jackpot payout
      * @param _price The price to send a tweet
      * @param _jackpot The value of the jackpot to pay out
      */
      constructor(uint8 _odds, uint256 _price, uint256 _jackpot) payable {
          odds = _odds;
          price = _price;
          jackpot = _jackpot;
      }
...- Lines 1, 2, 11: For the Twitt3r contract, we import and inherit from the OpenZeppelin
OwnableandPausablecontracts. These give the contract owner some additional control over Twitt3r after it’s deployed. We can restrict updating state variables, like the price to tweet or changing lottery odds, to just the owner address. - Lines 18-25: The main data structure is the
Tweetstruct, which contains a collection of properties that describe new tweets sent by users. The interesting one is thedeletedflag. Since we can never really delete something from the blockchain (remember, immutable!), we need some other way to indicate when a user has deleted a tweet. This flag tells us that we should hide the tweet in the UI, although the data is still there on chain if you were to look for it. - Line 33: The constructor is similar to the HelloWorld one we saw earlier, with one difference. We’ve added the
payablekeyword, which tells the EVM that this contract can accept payments from users. By default, we set a (small) price to send tweets to ensure that the contract won’t be spammed.
/**
  * @notice Send a message (tweet) to the contract
  * @param _message The sender's message to post
  * @param _replyID The ID of the tweet being replied to, 0 for top-level tweets
  * @param _retweetID The ID of the tweet being resent, 0 for top-level tweets
  */
function newTweet(
    string memory _message,
    uint256 _replyID,
    uint256 _retweetID
) public payable whenNotPaused {
    if (msg.value < price) revert InvalidPrice();
    if (bytes(_message).length > 280) revert InvalidMessage();
    if (lastTweetedAt[msg.sender] + 1 minutes >= block.timestamp)
        revert SenderCooldown();

    console.log("%s has tweeted!", msg.sender); // DEBUG
    lastTweetedAt[msg.sender] = block.timestamp;
    tweets[id] = Tweet(
        msg.sender,
        block.timestamp,
        _message,
        false,
        _replyID,
        _retweetID
    );
    tweetIDs.push(id);

    // Check if the sender has won the jackpot
    checkLottery(payable(msg.sender));

    // Alert subscribers to the new tweet transaction
    emit NewTweet(
        id,
        msg.sender,
        block.timestamp,
        _message,
        false,
        _replyID,
        _retweetID
    );
    id++;
}- Lines 12-15:
newTweet()will be one of the most called functions in our contract, so it’s important to guard against bad actors. One way we can do this is withrevertchecks. When a new tweet is sent, we check if the sender paid the correct price, if their message is less than the character limit, and whether they are still on cooldown from their last tweet. If any of these conditions evaluate to true, the transaction will revert and the contract won’t be updated. - Line 30: Twitt3r has a lottery component built into it, which should incentivize users to post more often. On each tweet, the contract checks to see if the
msg.sender(or user) has randomly won the jackpot amount. We’ll look at this soon. - Lines 33-41: After a new tweet is sent, we need a way to alert the UI that there is new information to display. Events are a logging system built into the EVM, and can also double as a cheap data store. Our frontend client can subscribe to the contract to listen for these events.
/**
  * @notice Check whether the last sender won the lottery, based on the set odds
  * @dev Uses a simple RNG method based on block difficulty and timestamp, could be improved
  * @param _sender The most recent tweet sender
  */
function checkLottery(address payable _sender) private {
    if (address(this).balance < jackpot) revert InsufficientBalance();

    uint256 randomNumber = (block.difficulty + block.timestamp + seed) % 100;
    seed = randomNumber;

    console.log("Random # generated: %s", randomNumber); // DEBUG

    if (randomNumber < odds) {
        console.log("%s has won!", msg.sender); // DEBUG

        (bool sent, ) = _sender.call{value: jackpot}("");
        if (!sent) revert WithdrawalFailed();
        emit WonLottery(_sender, jackpot);
    }
}- Lines 9-10: As previously discussed, Twitt3r contains a lottery function to randomly pay out users of the protocol. As it turns out, getting true randomness on a deterministic blockchain is a really difficult problem. Here’s a great SO answer on the topic, if you are interested. For our use case, a simpler method will suffice: We can get a pseudo-random number by using a combination of hard-to-predict values, such as the
block.difficultyandblock.timestamp. We also add in a randomseedvalue, which is set inside the contract itself. This basic RNG can be used to check whether the user has won a jackpot.
That about covers the contract! The rest of the code is dedicated to modifying existing tweets, broadcasting events, and getters/setters for the various contract properties.
Testing Your Contract
A critical part of the development stack that has gone unmentioned so far is Hardhat. Hardhat lets us simulate a local version of Ethereum, allowing us to test and debug our contract before deploying to mainnet.
Remember, thoroughly testing all of the functions within your contract is strongly encouraged. We can write unit tests with Chai assertions, and Hardhat will run them against a local copy of our contract. To run tests, call npx hardhat test while your local environment is active.
Here’s the test cases for the newTweet() function:
describe("New tweets", function () {
  it("Should allow users to tweet", async function () {
    const { twitt3r, owner, price } = await loadFixture(twitt3rFixture)
    await expect(twitt3r.connect(owner).newTweet("Test message", 0, 0, price)).to.emit(twitt3r, "NewTweet")
  })

  it("Should not allow users to tweet when paying the wrong price", async function () {
    const { twitt3r, owner } = await loadFixture(twitt3rFixture)
    await expect(
      twitt3r.connect(owner).newTweet("Test message", 0, 0, { value: hre.ethers.utils.parseEther("0") }),
    ).to.be.revertedWithCustomError(twitt3r, "InvalidPrice")
  })

  it("Should not allow users to tweet with more than 280 characters", async function () {
    const { twitt3r, owner, price } = await loadFixture(twitt3rFixture)
    await expect(
      twitt3r
        .connect(owner)
        .newTweet(
          "0123456789012345678901234567890123456789012345678901234567890123456789012345678901234567890123456789012345678901234567891234567890123456789012345678901234567890123456789012345678901234567890123456789012345678901234567890123456789012345678901234567890123456789012345678901234567890",
          0,
          0,
          price,
        ),
    ).to.be.revertedWithCustomError(twitt3r, "InvalidMessage")
  })

  it("Should not allow users to tweet within the 1 minute cooldown", async function () {
    const { twitt3r, owner, price } = await loadFixture(twitt3rFixture)
    await twitt3r.connect(owner).newTweet("Test message", 0, 0, price)
    await expect(twitt3r.newTweet("Second message", 0, 0, price)).to.be.revertedWithCustomError(
      twitt3r,
      "SenderCooldown",
    )
  })
})
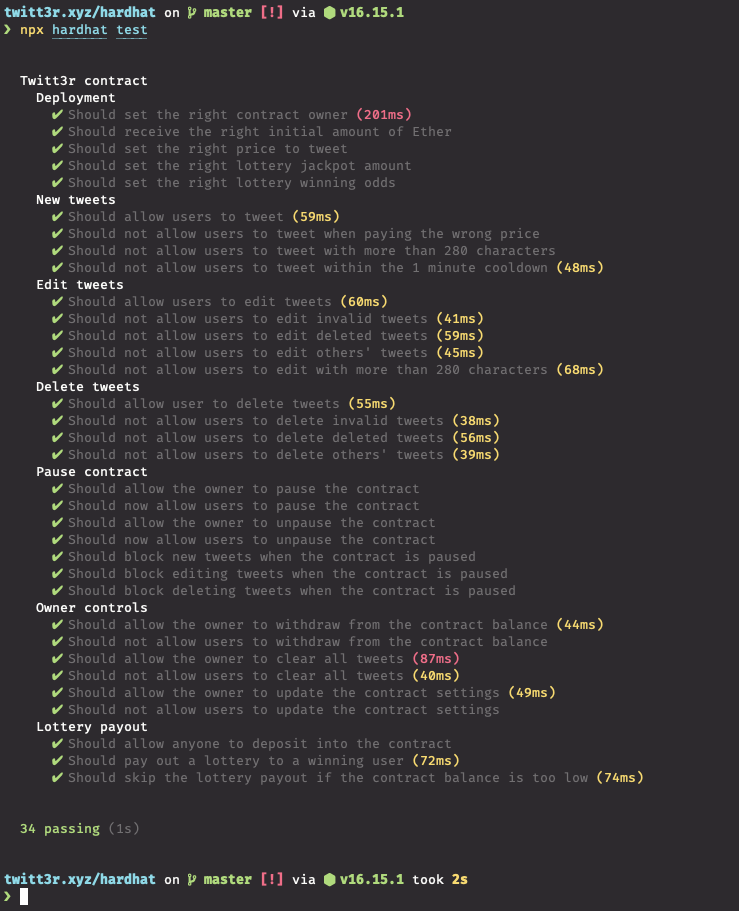
We can test our functions in both the positive and negative cases, making sure that the revert conditions we set earlier act as expected. Here’s the result of running all of our tests:

With a passing suite of tests, we can protect from the most glaring contract issues. There’s a lot more we could cover on the contract side, but it’s time to move on. Feel free to poke around in the GitHub repo.
Frontend UI
After we have a working contract, we’ll typically want an easy, intuitve way to interact with it. Sure, you could try to use Etherscan for everything, but it’s not the most pleasant experience. So let’s build a website!
I’ll skip over the core stack of React, Next.js, and Tailwind CSS. If you’d like to read more about those, be sure to check out my post on building this blog!
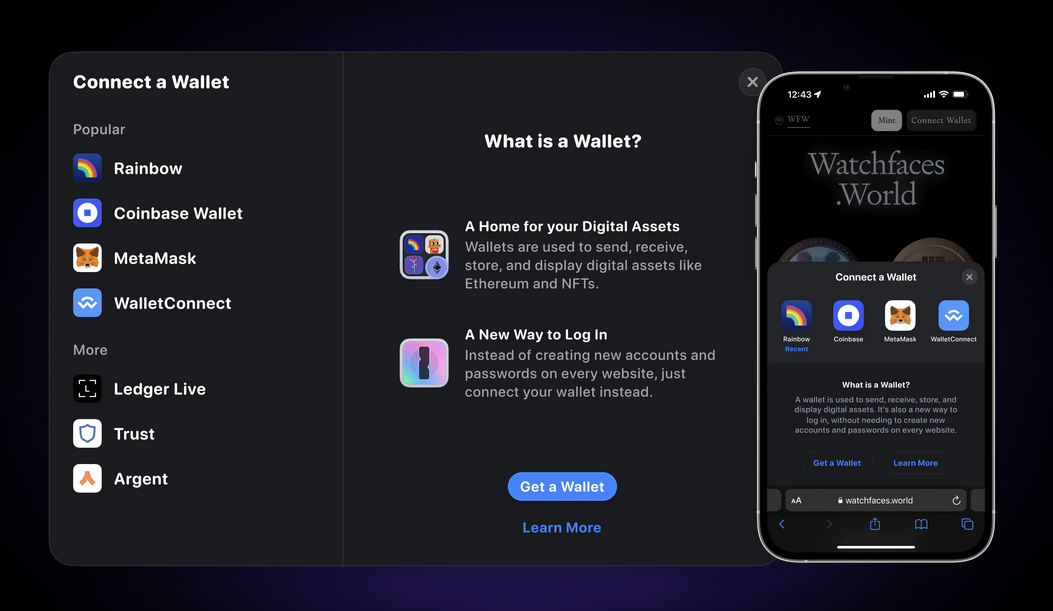
The first thing new users will need to do on Twitt3r is connect their wallet. Fortunately, RainbowKit makes this incredibly easy:

Image courtesy of Rainbow.me
- Supports all major wallet providers
- Easy to configure multi-chain support
- Adapts from desktop to mobile
- Built-in light/dark themes, or customize your own
I could go on, but it really is the easiest way to connect a wallet.
Contract Hooks
Once users are connected, they are ready to send, reply to, and retweet others. All of those actions have a corresponding contract function that needs to be called, so we will need a library to handle that. The two largest players here are web3.js and ethers.js. web3 is the older library, and it operates under a single object model, where there is only one “node” that performs all read/write actions.
Ethers, on the other hand, separates concerns into two classes: providers and signers. An example why this is desirable: separately using an outside provider (like Infura or Alchemy) to pull information from the chain, but still having the user sign transactions locally. Plus, Ethers natively supports the Ethereum Name Service (ENS), which will be useful for constucting user profiles.
With these things in mind, I decided to go with ethers.js. Let’s look at the code for sending a new tweet to our contract:
/**
 * Submit a new tweet to the contract
 */
const sendTweet = async () => {
  try {
    const provider = await props.loadProvider()
    const signer = provider.getSigner()
    const contract = new ethers.Contract(contractAddress, contractABI, signer)

    const txn = await contract.tweet(message, {
      value: ethers.utils.parseUnits("0.0002"),
      gasLimit: 300000,
    })

    await txn.wait()
    console.debug("Tweeted --", txn.hash)
  } catch (error) {
    console.error("Transaction failed --", error)
  }
This is okay, but it is annoying to have to retrieve the provider/signer at the start of every contract interaction. Additionally, what about things like auto refreshing, caching, and error handling? Do we would need to build all of that ourselves?
Enter wagmi.sh. wagmi is a React hooks library built on top of ethers.js, and it’s seriously awesome. For just about any interaction you could think of, wagmi already has a hook built out for you. For instance, here’s how error handling is done:
const { write: newTweet } = useContractWrite(
  {
    addressOrName: contractAddress,
    contractInterface: contractABI,
  },
  "newTweet",
  {
    onSuccess(data) {
      console.debug("Tweeted --", data.hash)
    },
    onError(error) {
      console.error("Transaction failed --", error)
    },
  },
)

/**
 * Submit a new tweet to the contract
 */
const sendTweet = () => {
  try {
    newTweet({
      args: [message.toString(), 0, 0],
      overrides: { value: ethers.utils.parseEther(price) },
    })
  } catch (error) {
    console.error("Contract call failed --", error)
  }
}
Now we can provide specific error messages before we call the contract, when a transaction has failed, or alert users after a successful tweet. I find the added flexibility is worth the additional lines of code. And this is just scratching the surface, there’s tons of other properties to explore.
User Profiles
The last piece of the puzzle for a social media site is storing user profile information. Typically, users will want to set a custom avatar, have a short bio, and maybe add some links to their other socials. We could take in this information as a part of the Twitt3r contract, but that would not be very cost-effective. In keeping with the ethos of Ethereum, we should look for another protocol that already contains all of the metadata we need. Of course, I am talking about ENS.
The Ethereum Name Service is the username, avatar, and profile of web3. It allows you to assign a human-readable name to any wallet address, and users can add any number of other fields to share with web3 applications. As an example, here is what my ENS profile looks like:

You can see that I’ve set a profile picture, added a short bio, and linked to a bunch of different social networks. We can make use of all of this information on Twitt3r, which is actually quite easy thanks to wagmi and ethers. Let’s look at how to pull this data:
const router = useRouter()
const { address: address } = router.query
const [ens, setEns] = useState(address)
const [avatar, setAvatar] = useState()
const [description, setDescription] = useState("No ENS description found...")

const { data: name, refetch: nameRefetch } = useEnsName({
  address: address,
  enabled: false,
  onSuccess(data) {
    setEns(data ? data : address)
  },
})

const { refetch: avatarRefetch } = useEnsAvatar({
  addressOrName: address,
  enabled: false,
  onSuccess(data) {
    if (data) setAvatar(data)
  },
})

const { refetch: resolverRefetch } = useEnsResolver({
  name: name,
  enabled: false,
  onSuccess(data) {
    data.getText("description").then((value) => {
      if (value) setDescription(value)
    })
  },
})

/**
 * On page load, fetch the ENS profile details (if it exists)
 */
useEffect(() => {
  if (address) {
    nameRefetch()
    avatarRefetch()
  }
  if (ens) {
    resolverRefetch()
  }
}, [address, ens, nameRefetch, avatarRefetch, resolverRefetch])
wagmi already has built in hooks for getting the name and avatar of a given wallet address, and a general purpose resolver to fetch other fields of the profile. For Twitt3r’s profile page, all we need is an address; if an ENS profile exists, wagmi will pull the information for us. We also make use of the refetch promise here, since the default Next.js router may not return the wallet address before page load.
Wrapping Up
That’s about it! You now have all of the core components to build your own Twitter clone on Ethereum. And because the Twitt3r contract is deployed on a public blockchain, you can build your own frontend while still using the same exact dataset. That’s the power of building open protocols 😁.
Helpful Resources
I’ve gone through a lot of different tutorials to learn web3 development. If you’d like to go deeper with this new technology stack, here are some of the resources I recommend:
- buildspace.so: Cohort-based introductory projects to web3 (Ethereum, Polygon, & Solana)
- CryptoZombies: Mini-lessons in Solidity development, testing, and frontend development
- Full Stack Ethereum Development by Nadar Dabit: An end-to-end hello world and ERC20 project using React, Hardhat, and Solidity
- Speed Run Ethereum by Austin Griffith: Self-guided project series, utilizing the Scaffold-ETH software stack
- Full Blockchain, Solidity, & Web3 Course by Patrick Collins: Comprehensive 32 hour (!!!) course covering Ethereum, Solidity, Hardhat, and much more!
Thanks for reading! If you have any questions, feel free to reach out to me on Twitter (the real one!)
Read more posts